
These are going to be your bottom pieces. Let's start from the left. You want to trace and cut out a piece of canvas-like fabric (1st piece of fabric). Then you are going to iron on fusible interfacing onto the canvas-like fabric (2nd piece of fabric). You want to cut out a piece of patterned fabric and set aside (3rd piece of fabric). Lastly, you're going to cut out a 2nd piece of patterned fabric and you're going to sew together your canvas-like fabric with the ironed on interfacing to this piece of pattered fabric and set aside (4th piece of fabric). This will make the bottom of your bag a lot more sturdy.

Trace the bag body onto your fabric of choice...your will need 4 bag bodies total.

Cut out all 4 pieces of fabric.

This fabric is from Uganda. I went there on a missions trip with my college. My niece really wants to go there, so I thought it would be appropriate to make part of her bag out of this fabric. =)

This fabric is from Kenya. A friend went there on a missions trip and brought this fabric back for me.

Once you have your 4 bag body pieces cut out you want to sew 2 of them together down the middle. Iron your seams down. I skipped the pocket that the blogger does on the inside of her bag because I wanted my bag to reversible. So, in essence I wanted my nieces to get 2 bags in 1.

You're going to sew your other 2 pieces of fabric down the middle as well.
Iron seams down and then put both sewn pieces of fabric together face-to-face.

Start pinning all the way around the entire top. This is another revision...She (the original blogger) doesn't sew the very tops, she leaves them opened and sews them together later. I however, do not like the way it looks when it's finished. I sew all the way around the top because you're going to end up tying the straps in a knot once you're done sewing your hobo bag in its entirety, so you technically don't need to sew the straps together. Plus, it leaves it to the person you're giving it to, to tie it at whatever length best fits them.

All 4 body pieces are sewn together and turned back right side out and ironed. This is where the bag starts to get tricky.
 |
| picture from destashification.com |
You're going to pull both sides together, pin and sew.
 |
| picture from destashification.com |
It will look like a bag with no bottom when you're finished.
 |
| picture from destashification.com |
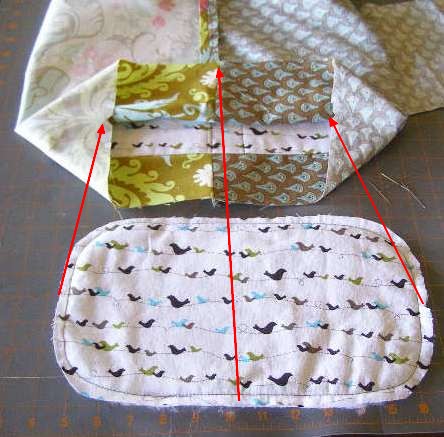
Now you're going to grab the bottom piece that does not have the canvas-like fabric
and fusible interfacing sewn to it (she has the sewn one shown...I do this part a little
differently as well) and start pinning it to 1 of the 2 layers of the bag. I explain why I sew
this bottom piece first a little later. I start pinning at the spots she has arrows pointing to
first..it helps get everything aligned correctly.
 |
| picture from destashification.com |
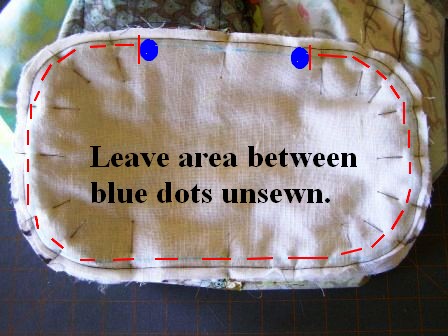
Pin all the way around leaving an opening. Sew only where you have the bag pinned.
Once the 1st bottom is sewn you want to pull the other side of the bag through the hole
that was left unsewn and pin the bottom piece that does have the canvas-like fabric
and fusible interfacing. This time you'll sew all the way around...do not leave a hole
unsewn, like we did with the first bottom piece.
 |
| picture from destashification.com |
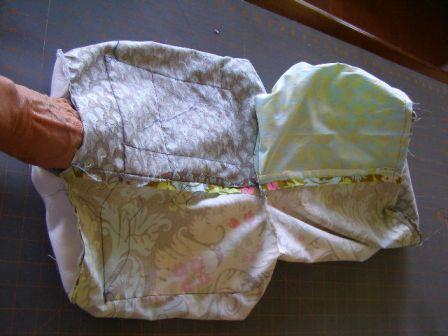
Now...pull the 2nd side (the side you just finished sewing) through the hole to make the bag right side out again. You have to sew the hole shut to finish the bag. I iron a seam and just sew as close to the edge as possible...it's easier to sew your bag's body to your plain fabric bottom without the canvas-like fabric and fusible interfacing. This is the reason I sew the plain fabric bottom on first...I also think it leaves a better finished look.

tah dah!

My 2 nieces, Jaimee & Jolin, opening their Christmas present from me (& Branson). =)

I loved how surprised they were! =)


Jolin loved it so much she came over the other day and I helped her make her
own hobo bag. =) This her finished product. Not bad for her first bag EVER!


This is the reverse side.

Just a little modeling. =)

And we're excited!! =P


This one of my finished bags...I really like them!! =)

I know the directions are slightly confusing. I actually read over original blogger's directions about 10 times each step to make sure I was doing everything correctly. =) That's why I've simplified a few of her steps...and I love that the bag is reversible now. You're first bag will always take you the longest, but once you get it all figured out...it's a cinch after that. =) Good luck on making your own hobo bag. =) If you do end up making one...I want to see it!!
So, please do share. =)
So, please do share. =)

I love these Amanda! They are so pretty!! Good job! Wish I knew how to sew! :D
ReplyDeleteThanks, Jess! =) I taught myself how to sew. I read through my entire sewing machine manual and started watching tutorials on YouTube...and then I started with something simple, like pillows and worked my way up to harder things. I wish I had lessons though for the more difficult things...maybe someday. =)
DeleteMARAVILHOSO!
DeleteJess,
DeleteLike Amandita, you have to WANT to learn it bad enough! My name is Brenda and I also taught myself to sew many, many years ago, and guess what? I started with 'Very Easy, Very Vogue.' There are good sewers today who are intimidated by Vogue patterns, but I was too green to even realize the difference. I even bought a travel sewing machine not realizing what it was either, I bought it simply because it was small and cute, lol. Amandita has the right idea! You just have to keep at it and don't EVER get up and you will find yourself getting better and better and better. My sister's use to giggle and laugh at my first early 'creations.'
I was so determined, I didn't let anything stop me. No one in my family sewed. OH BUT.... one day, people began saying things like, "you made THAT????" or "I KNOW you didn't make THAT??"
Trust me, it will come. I didn't have all the videos and free instruction you can find now, so you are very blessed. One of the best videos you can watch is 'Sewing with Nancy,' to learn great techniques and make sure you get the right equipment, and find a dedicated space if possible. Ladies, now I can make ANYTHING I want. I got so good, I used to stop at the fabric shop on my way home from work, run home cut out an outfit and wear it back to work the next morning! I became so fast, I could easily make a suit in one day, because by this time, it became a TALENT. But I started just like Amandita. And ladies, NONE of it is difficult, it is all simply 'TECHNIQUE.' And technique can be learned. Best of luck and happy sewing!!!!
*give up
Delete(not get up!). lol
I have only just seen your tutorial, and it was lovely, you are quite inspiring, I am like you at the begining of a very exciting time, I am in my 50s and used to sew a little when I was alot younger, now I have a bit more free time and have run before I could walk, Sewing two Tilda dolls because I fell in love with them on pintrest, so i bought a book and away I ran, I made mistakes and got frustrated, but as you say dont give up and hey presto I have tow lovely dolls that spur me on to try out so many more things, I feel that if i can turn corners and shapes on the sewing machine with the tiny inticate doll body parts then I must be doing ok...Thank you for sharing xx
DeleteThat is so sweet of you Amanda! You did a great job for your niece. Moreover, I am grateful to you for sharing this tutorial with readers. Thanks a lot.
ReplyDeleteDesigner Bags
Great tutorial. I'm just starting out sewing, looking for bag ideas and this one is great and gives the right amount of information. Thank you!
ReplyDeleteTop Site for Seattle Divorce Attorney Information
hoho... super cute bag. I'll try to sew bag well :D thaks for the great tutorial :D
ReplyDeleteHave you ever tried making this smaller? I just cut out the pattern using a square one inch & didn't think about the finished size until I actually handled the fabric. It is too big for a preteen who asked me to make one for her. I'm thinking about redoing the pattern so that 1 square 1/2 inch or smaller. Any suggestions about adjusting the size now?
ReplyDelete+Amanda;(not sure if that's your name).Anyhow I just post to say thanks for sharing this written tutorial on hobo bag making. I love sewing different bag styles ideas from other online bloggers hope that what you called them.Anyhow my Queries Are; When done cut out your four pieces of fabrics (2 outside) & 2 lining fabrics are you suppose to take one of each as in 1 outside & 1 inside/lining pieces and sew the two different fabric pieces together & seen in the middle/center is that how the bag is to be made up; just asking. Secondly & finally or can you sew the two outer pieces together & then the lining pieces at one side joining them in this manner & then continue the rest of the steps from there to achieve the same results can it be done the way I mention in this post just asking if understood my query questions. I look forward in advance for your reply & help as well.Tafs
ReplyDelete